Wednesday night we made our cardbox that will hold all the cards at the wedding. Its everything I wanted it to be and MORE :) We had a really good time making it too! We got all our supplies together and our Margaritas then went to town. It took about an hour or so but just because the actual top was a little tricky and I had to do it twice :( It was all trial and error though. We had a basic idea of what we were doing from a couple other websites including the blog Road to the Aisle but really we didn't follow her measurements. We just used some L-Brackets and attatched all the frames together then just put a bottom and a top on it and bam it was done! Its so pretty-The frames are white and the top is a yellow and white plaid design! It was actually the first thing for the wedding we've done together! I went home by myself and met all the vendors in March that we're booking so he hasn't really done anything so this was very nice to do it together! I actually think he's more into the idea of the wedding now that he's done something for it!
Supplies/Directions:
4 Picture Frames-I used 8x10 frames but you can do whatever you want. Believe me 8x10 was big enough!
L-Brackets-I used 16 brackets total-4 packets of 4
Screws-for the L brackets-I used #8 so they wouldn't go through the holes in the brackets and 1/2" deep ones so they didn't go through the frames
Foam Board
Pretty Fabric
Batting
Drill
Screwdriver
Stapler
Duck Tape
First we attatched all four frames together with L Brackets-We didn't really measure where we put them, we just attatched them (two on each side of the frame) then just lined the frames up and attatched it to the other frame wherever it lined up at right! I left the glass in for this step and I think it would've been easier if the glass would've been removed but its up to you. We had to use a screwdriver instead of a drill to attatch the last frame since the drill wouldn't fit in the box.

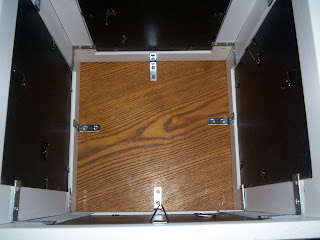
After we had the four sides together we added four L brackets to the bottom half of the frames to make a shelf support for the foam board to sit on. For the foam board I just took a ruler and measured the space between the frames-then just cut the board to that size and dropped it in!
These two pictures are looking into the box at the bottom. The one without the foam board and the other with.
 After the bottom was in we duck taped it to the L brackets just for a little extra support.
After we put the bottom on it was time for the top. I felt like the top was the hardest part. I first cut the top the same size as the bottom with an exacto knife, which was fine. But I needed the top to be a little smaller because with the batting and fabric it wasn't going to fit. The hard part was trimming the foam board, I tried to use the knife but that didn't work so I switched to scissors, which were a pain in the ass. They ended up working but it took forever to just trim it down a little to what I needed it to be.
We attatched four L brackets-one to each from to make a shelf for the top to sit on as well. Just like we did for the bottom but with them upside down. All in all I think it turned out pretty well! I plan on re-doing the top though..Its too wrinkly for my tastes so I want to try and smooth it out! Heres the finished product though!


No comments:
Post a Comment